This is just to let you also know I am not dead. Rather merely running out of free time. So here is a list of things Ive been up to and will write about in the near future.
- Analog to digital Conversions
- Pulse Width Modulation
- Assembly Language
- Verlilog Language
- Gate Logic
- Opamps (probably soon due to an exam)
- LaTex ( Soon because it is soooooo helpful for technical writing)
- Some secret stuuf I cant mention until it is published.
- Building custom Android ROM's
and
- pi2go is getting some cool GPS tracking and touchscreen features
Until then, if you want to hear about any of these topics let me know!
Thursday, October 17, 2013

Saturday, August 24, 2013
Did somebody say custom??
So I decided to take a small break today in order to bring up an old topic.....Kernels.
Now if you're just like me, running something stock is just like "using devils left hand to care for young children." One way to change direction is to utilize an alternate kernel. Now this time I am speaking strictly of the Ubuntu distro. (Ask me later of my custom Nexus 4 kernel.) I will give you Very Easy! step by step instructions in order to harness the raw power of alternate kernels.
One may ask "What will a new kernel do?" Well in laymans terms, it allows one's system to be brought on the same level with all new linux commits straight from Linus himself. So basically "The Bleeding Edge" (Not to be confused with Ubuntu Edge *insert sad story)
Now on my system I currently run the RC Ubuntu kernel, but I will provide the links to a very good custom kernel know as pf-kernel. This kernel has many more optimizations.
Now since that is out of the way..... lets download said kernel:
- For stock Ubuntu: http://kernel.ubuntu.com/~kernel-ppa/mainline/
- pf-kernel if you choose: http://repos.natalenko.name/debian/pf/
Note: pf-kernel has many Linux optimizations read here for a good little article.
If you do not want to play safe.....totally cool. Besides where is the fun in safety. (Be sure to keep a backup. Covered at the end)
In order to find out your current version of kernel open a terminal and type
YOU NEED TO KNOW WHICH. To find out refer to Step 1 above.
In this example I will be using "amd64."
Next you need to download 3 files "linux-headers", "linux-image", and linux-headers-xxxxxxxxxxxx_all.deb." Refer to Figure 3.
Choose the correct ones for your architecture. Once they have finished downloading open a terminal and "cd" to the download location.
Figure 5 shows a grub shot. (Outdated)
In order to rid a kernel of being installed use apt-get.
Important: Be sure to leave at least one STABLE kernel on your system. In case something goes wrong. At least you will be able to boot to the old kernel. (This is what I considered a backup)
**For those that care
Ubuntu 13.04, amd64, 3.9.0-030900-generic
Now if you're just like me, running something stock is just like "using devils left hand to care for young children." One way to change direction is to utilize an alternate kernel. Now this time I am speaking strictly of the Ubuntu distro. (Ask me later of my custom Nexus 4 kernel.) I will give you Very Easy! step by step instructions in order to harness the raw power of alternate kernels.
One may ask "What will a new kernel do?" Well in laymans terms, it allows one's system to be brought on the same level with all new linux commits straight from Linus himself. So basically "The Bleeding Edge" (Not to be confused with Ubuntu Edge *insert sad story)
Now on my system I currently run the RC Ubuntu kernel, but I will provide the links to a very good custom kernel know as pf-kernel. This kernel has many more optimizations.
First off .........NOT RESPONSIBLE FOR ANYTHING THAT GOES WRONG!!!!
Now since that is out of the way..... lets download said kernel:
- For stock Ubuntu: http://kernel.ubuntu.com/~kernel-ppa/mainline/
- pf-kernel if you choose: http://repos.natalenko.name/debian/pf/
Note: pf-kernel has many Linux optimizations read here for a good little article.
Step 1: Find the current version you need.
To play it safe grab a version with your same release name. i.e. 13.04 is "raring" |
| Figure 1 |
In order to find out your current version of kernel open a terminal and type
uname -aGiving a response of Figure 2. I have version 3.9.0-030900
 |
| Figure 2 |
Step 2: Download the right 3
On the next page you will 3 different endings "amd64", "armhf", and "i386." This is your architecture.YOU NEED TO KNOW WHICH. To find out refer to Step 1 above.
In this example I will be using "amd64."
Next you need to download 3 files "linux-headers", "linux-image", and linux-headers-xxxxxxxxxxxx_all.deb." Refer to Figure 3.
 | |
| Figure 3 |
cd ~/Downloads
Step 3: Time to install
Once in the working directory runsudo dpkg -i *.debNote the "*.deb" makes dpkg use every deb file in directory. If you have more then the 3 recently downloaded > MOVE to a new directory!
Step 4: Update
In order to boot a new kernel you need to update the grub. In order to do this run:sudo update-grub2The result should be much like Figure 4 below.
 |
| Figure 4 |
Step 5: Reboot
The final step. Reboot your device. At the grub menu(after bios) choose your new kernel. Note: you may have to press escape in order to show the menu.Figure 5 shows a grub shot. (Outdated)
 |
| Figure 5 |
Cleanup/Backup
Despite not being an actual step these are very important.In order to rid a kernel of being installed use apt-get.
sudo apt-get remove linux-xxxxxxxxxxxx being the "linux-headers" or "linux-image." Remember to remove all 3 files mentioned above in Step 2.
Important: Be sure to leave at least one STABLE kernel on your system. In case something goes wrong. At least you will be able to boot to the old kernel. (This is what I considered a backup)
FINI
There you have it your very own....nonstock....kernel. If you have any questions feel free to ask.**For those that care
Ubuntu 13.04, amd64, 3.9.0-030900-generic
Monday, July 8, 2013
RPi is planted
So I decided to take it upon myself to finally mount my pi/screen in my vehicle.
Here are the results, luckily the 'stang had an extra din slot for the old '00 radio that was replaced awhile back. I bought a 7"TFT of ebay for ~$30 here. I am currently looking into purchasing a digitizer for it (touch screen.)
So here we go:
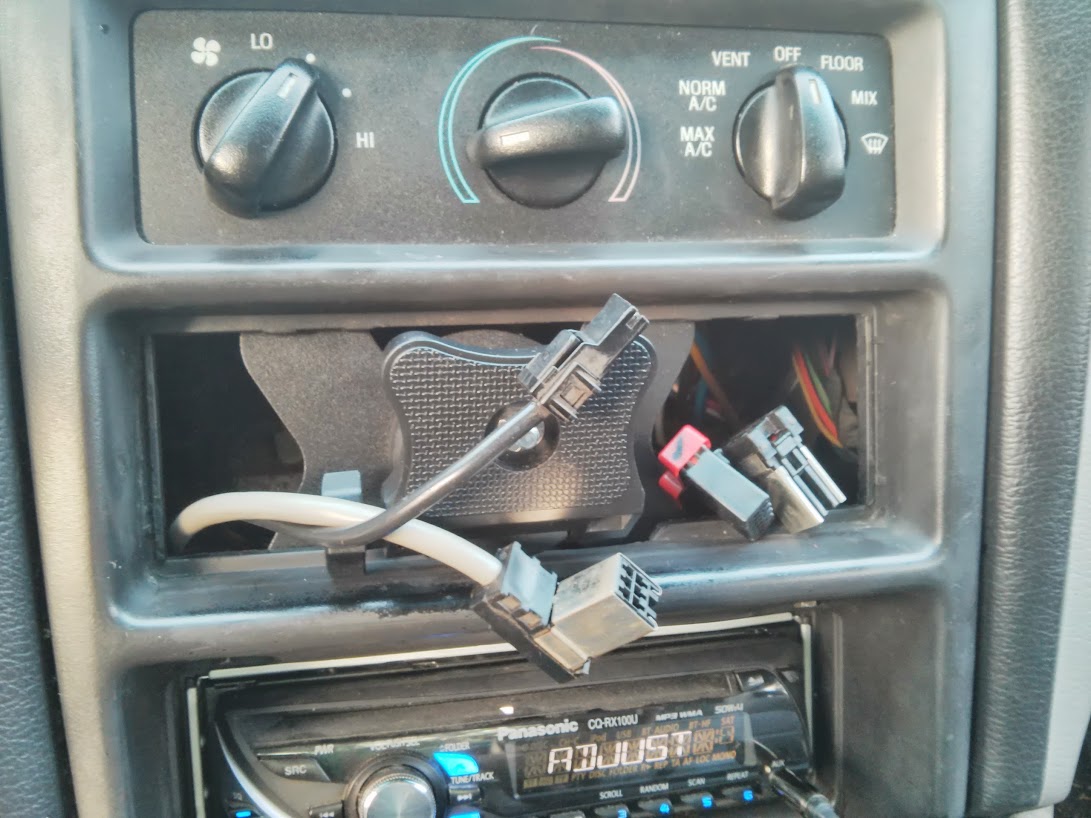
In Figure 1 notice the radio in Din 3. (Counting the vents as Din 1.)
I then proceeded to take out the center console. Depicted in Figure 2 and 3 below.
This allowed me to mount the stand for the screen. Figure 4 Also note the radio is now in Din4.
The screen is slightly larger then the Din available, in order to account for this I had to improvise. I made the mount able to tilt up and down. Figure 5 and 6 below.
I have yet to wire everything into key-on power, but here is the near-end result. Figure 7 and 8. Running pi2go ...of course

Through the whole process I only lost one important bolt, I call that a win. Despite the fact it was for mounting the screen. :/
So.....let me know what you think. As always if your interested in the project follow this blog, add me to your circles, or follow github.
Just for fun in-progress photos:


Soon I will be adding Bluetooth support to the UI. I also fixed that pesky UI update issue by utilizing a QThread.
**For those that care:
Built on the RPi using python2.7, QT4, 7" TFTLCD Screen
Here are the results, luckily the 'stang had an extra din slot for the old '00 radio that was replaced awhile back. I bought a 7"TFT of ebay for ~$30 here. I am currently looking into purchasing a digitizer for it (touch screen.)
So here we go:
In Figure 1 notice the radio in Din 3. (Counting the vents as Din 1.)
 | ||
| Figure1: Before |
 | |
| Figure 2 |
 | ||||
| Figure 3 |
This allowed me to mount the stand for the screen. Figure 4 Also note the radio is now in Din4.
 | |||||
| Figure 4 |
 |
| Figure 5 |
 |
| Figure 6 |
 |
| Figure 7 |

Through the whole process I only lost one important bolt, I call that a win. Despite the fact it was for mounting the screen. :/
So.....let me know what you think. As always if your interested in the project follow this blog, add me to your circles, or follow github.
Just for fun in-progress photos:


Soon I will be adding Bluetooth support to the UI. I also fixed that pesky UI update issue by utilizing a QThread.
**For those that care:
Built on the RPi using python2.7, QT4, 7" TFTLCD Screen
Friday, June 28, 2013
OpenCV Vision of the future!!
Its been awhile since I made a post, so I will make a few updates
- pi2go Is working even fixed that pesky GUI not updating issue with a Qthread.
- pi2go also has its very own 7in screen I have yet to mount. (Ill do a post with updates soon.)
- Halo is now open source!! Yeah, I know its kind of old news but im loving the functionality.
But now its time to describe my latest project and why I havent been around for awhile: OpenCV.
In what else but Python --->> but eventually MATLAB for Simulink reasons.
OpenCV is "Open Computer Vision." The idea behind this is to make most computer vision tasks as easy as possible to complete. So what am I doing with it? I'm trying to integrate object avoidance with stereo vision. So far I have managed to make a disparity map using 2 uncalibrated images.
You really cant see to much relation yet between the 2 figures.
Figure 1 the disparity map shows that close objects as black and farther objects as white, basically the depth of the image using. In order to get a clear image the camera needs to be calibrated. From this map I would like to be able to pick out individual objects that are extremely close by.
I have been testing with 2 close images taken from my nexus 4....sooooo not too accurate. Once I get the stereo vision up/working and calibrated These images will be much better. Stay tuned!!!
**For those that care
OpenCV 4.5.2 ~cv2 , Python2.7, scipy
- pi2go Is working even fixed that pesky GUI not updating issue with a Qthread.
- pi2go also has its very own 7in screen I have yet to mount. (Ill do a post with updates soon.)
- Halo is now open source!! Yeah, I know its kind of old news but im loving the functionality.
But now its time to describe my latest project and why I havent been around for awhile: OpenCV.
In what else but Python --->> but eventually MATLAB for Simulink reasons.
OpenCV is "Open Computer Vision." The idea behind this is to make most computer vision tasks as easy as possible to complete. So what am I doing with it? I'm trying to integrate object avoidance with stereo vision. So far I have managed to make a disparity map using 2 uncalibrated images.
You really cant see to much relation yet between the 2 figures.
 |
| Figure 1 |
 |
| Figure 2 |
Figure 1 the disparity map shows that close objects as black and farther objects as white, basically the depth of the image using. In order to get a clear image the camera needs to be calibrated. From this map I would like to be able to pick out individual objects that are extremely close by.
I have been testing with 2 close images taken from my nexus 4....sooooo not too accurate. Once I get the stereo vision up/working and calibrated These images will be much better. Stay tuned!!!
**For those that care
OpenCV 4.5.2 ~cv2 , Python2.7, scipy
Sunday, June 9, 2013
Ouch!!! I broke Unity/How to fix it
So as many of you know the dangers of playing with graphic drivers in Linux. They have to potential to render your desktop useless. In fact many remain with open source drivers for this very reason. Well anyway I have been playing around with AMD drivers for the last month and has proven to be a miserable feat. More then once this has rendered Unity broken missing both window decorators and system panels *weep. To top it all off the Unity plug-in would become disabled from Compiz and would not re-enable for multiple reasons. (Open gl, window shutters, ...blah blah)
Anyway.......
Unity malfunction is not exclusive to graphic driver installations. For this reason I think it is important to know these following 2 commands.
I hope these are useful to you. I also hope you will never need them haha.
=================================================
Next I would like to do another write-up on helpful ssh tools including scp and nmap. On another note maybe dd and pv; pretty much anything I find useful and use on an almost daily basis.
Let me know if there is any particular command you would want a write-up on.
Anyway.......
Unity malfunction is not exclusive to graphic driver installations. For this reason I think it is important to know these following 2 commands.
sudo dconf reset -f /org/compiz/This command resets all dconf settings that may have changed. "dconf" Is a program for editing all of your configuration files. If by chance you are missing this program run the following command.
sudo apt-get install dconf-toolsThe second Unity command I believe should be general knowledge is:
unity --reset-icons &disownThis command may not need to be run after dconf, However it is extremely useful if one decides to play with themes or other basic UI improvements.
I hope these are useful to you. I also hope you will never need them haha.
=================================================
Next I would like to do another write-up on helpful ssh tools including scp and nmap. On another note maybe dd and pv; pretty much anything I find useful and use on an almost daily basis.
Let me know if there is any particular command you would want a write-up on.
Tuesday, June 4, 2013
pi2go Is working 100%
For those that may like an update on how well pi2go is working. Well the answer is quite well actually. For this reason I will walk you through its functionality and how it works. pi2go Is written in python 2.7 utilizing pyQt4 and pySerial for Raspberry Pi. It is being created as an easy UI for a vehicle computer. So far the only feature is reading engine information from the OBDII sensor via Bluetooth.
First off in Figure 1 below displays the given start screen.
As stated in a previous post I would like to place a clock in the blank space on the right. Before I attempt that I need a little more info on QThreads. Pressing the "OBDII" tab will bring up the OBDII scanning feature displayed in Figure 2 below.
These are the current engine stats that are being read. Currently the values are updated every 1sec, I will be adding selector so this value can be changed to personal preference. Pressing the display "Start" button will initialize the scanning thread. (Thats right this python novice introduced multithreading.) This simply mean the background process is taking place outside the main program so it does not slow itself down.
Above Figure 3 displays information as it comes in, before it is updated on Figure 4.
First off in Figure 1 below displays the given start screen.
 |
| Figure 1 |
 |
| Figure 2 |
obdThread = Thread(target=self.write_to_UI(obdValue), args = (self,obdValue))
obdEvent = Event()Figure 3 and 4 below display the running program.
obdThread.start()
 |
| Figure 4 |
 |
| Figure 3 |
def write_to_UI(self,values):
"""Updates the UI with new values"""
# receive [speed, rpm, intake, coolant, load]
self.ui.lcdNumber_speed.display(values[0])
self.ui.lcdNumber_rpm.display(values[1])
self.ui.lcdNumber_inTemp.display(values[2])
self.ui.lcdNumber_coolTemp.display(values[3])
self.ui.lcdNumber_load.display(values[4])
QtGui.QApplication.processEvents() #Writes all pending changes to QT
return
The guts behind the scanning thread is all in pySerial. The code below show how the scanner obtains values from the OBDII sensor. This example is the speed however the method is the same for all.
First a serial port is connected, "rfcomm0" at a baud rate of "38400".
(I apologize for that long run on sentence I hope you were able to follow)
------------------------------------------------------------------------------------------------------------------------------
There you have it the basic functionality of pi2go and how it works. Any feedback will be outstanding!
As always if you would like to follow/keep up on this blog or check out github. I have many new features to add.
**For those that care written in Python2.7 utilizing pyQt4 over pySerial. Issue tracker
First a serial port is connected, "rfcomm0" at a baud rate of "38400".
self.serialIO = serial.Serial('/dev/rfcomm0', 38400, timeout=1)Then using the serialport you send send a hexadecimal PID which can be found here. In this case we send "01", "0D" and want a return "\r". ("01" stands for the current value, "0D" is speed.)
self.serialIO.write("01 0D \r")The above line will return a list of 1 string "['410D1D\r\r>']" not including quotes. The bold values are what is needed. They are a hexadecimal value so the code below first pulls the needed values by treating the string as a list. Then converts (Using the example) from a string, '1D', to hex value '0x1D' to an integer, base zero, 29 to a float 29.0 The final answer being in Kph
(I apologize for that long run on sentence I hope you were able to follow)
speed_list = self.serialIO.readline().split(' ')I then converted the value to Mph and returned it in a list with other values.
speed_hex = speed_list[0][4:6]
speed_float = float(int("0x"+speed_hex, 0))
speed_float = speed_float*0.621371 #Comment out if you would rather have KphThe last feature I added in this version is the ability to clear error codes. It is placed in the setting tab as depicted in Figure 5.
return speed_float
 |
| Figure 5 |
This tab will have more options evenly and will have feedback to the clearing function.
------------------------------------------------------------------------------------------------------------------------------
There you have it the basic functionality of pi2go and how it works. Any feedback will be outstanding!
As always if you would like to follow/keep up on this blog or check out github. I have many new features to add.
**For those that care written in Python2.7 utilizing pyQt4 over pySerial. Issue tracker
Thursday, May 30, 2013
Turning In Style.....turn signals
Slowly making progress on pi2go so I thought I would take a break and show another project. You may be wondering "Life of an EE," why is he always talking about software and programming..........
Well I bring you an kd8bny original: Sequential Turn Signals. If you don't know what this is (or don't understand my explanation below) press here.
Basically a turn signal on a vehicle using more then one light will flash "in-sequence," one after another, depending on the direction.
ASCII art -> ()()(*) -> ()(*)(*) -> (*)(*)(*) OR (*)()() -> (*)(*)() -> (*)(*)(*)
So in order to accomplish this I created a circuit using a 4528B Dual Monostable Multivibrator: datasheet. The original design utilized a basic decade counter but I changed the design feeling it was overcomplicated and stressed.
** If you want sch or brd files let me know, more then happy to share.
Well I bring you an kd8bny original: Sequential Turn Signals. If you don't know what this is (or don't understand my explanation below) press here.
Basically a turn signal on a vehicle using more then one light will flash "in-sequence," one after another, depending on the direction.
ASCII art -> ()()(*) -> ()(*)(*) -> (*)(*)(*) OR (*)()() -> (*)(*)() -> (*)(*)(*)
So in order to accomplish this I created a circuit using a 4528B Dual Monostable Multivibrator: datasheet. The original design utilized a basic decade counter but I changed the design feeling it was overcomplicated and stressed.
 |
| Figure 1 |
How She Works
As displayed in Figure 1 above the circuit is placed right between the turn signal line and the actual lights. The 4528 basically delays the signal by a fraction of a second creating staggering effect. The individual lights are controlled by 2 9530N Mosfets. In order to control the timing there are 2 trim pots (R1 and R2) in Figure 1. To install in a vehicle you need to tap into a separate +12V line just to power the circuit. If you do not it creates a constant resetting system. (This is just a single side i.e. 2 are needed)
The Working Version
#TODO
- Get a custom board printed
- Install them in the 'stang
** If you want sch or brd files let me know, more then happy to share.
Subscribe to:
Posts (Atom)